FAQ
This section covers some Frequently asked questions and answers.
After editing an image, it still looks the same in the gallery
All edits you do on an image won't touch the original image, but are stored in a sidefile (raw images) or the exif data (jpg images). The edits are just getting applied when you export the images.
If you always want to see the edits you've done, you can enable this by going into Preferences -> Displaying -> Render XMP settings.
Note: This will reduce the performance of browsing and viewing significantly, so only use this if you actually need it.
Does Photo Mate perform actual Raw decoding?
By default, Photo Mate does not decode raw data and only reads the embedded jpg-file of your Raw-Image when viewing images.
However, when you're going to edit an image, Photo Mate will decode the actual raw-data.
Here are some of the differences between actual decoding and reading embedded jpg data:
| Embedded-JPG | Raw Decoding | |
| Speed / Performance | Fast | Slow |
| Size | Not always full-size | Full-Size |
| Quality | Good, but already processed | Good, Unprocessed |
| Dynamic Range | Limited | Full Camera Range |
| Editing Capabilities | Small | Large |
Editing and Exporting Time
A common question asked by users is how long it actually takes to edit and convert raw-images on a device like a tablet. Unlike a "real" pc, tablets and smartphones have significantly weaker hardware, although on first sight it may looks like they also delivering desktop-class performance, but that's not true. Since these hardware is made for low power-consumption, passive cooling and small form-factors, you have much lower computing power than on any desktop pc (even low-end desktop pc's).
However, the question is still interesting, especially if you want to convert a lot of images. Raw-Image Processing is usually not a lightweight task, if you used software on your pc before, you probably already noticed that even desktop-pc's need some time to handle and edit these files.
So this page shows a chart for processing times on common devices. All these measures where taken manually, so they're may not perfectly accurate.
The measured time includes the full image decoding (Raw Image, Canon CR2), processing and saving as jpg-file in full resolution (including exif-data).
The "Basic" option includes: Whitebalance-Changes, Exposure, Contrast, Vibrance, Clarity
The "Advanced" option includes: Everything from Basic + Luminance + Color-Noise Reduction + Lens-Profile Adjustments (Vignetting, Distortion and Chromatic Aberration)
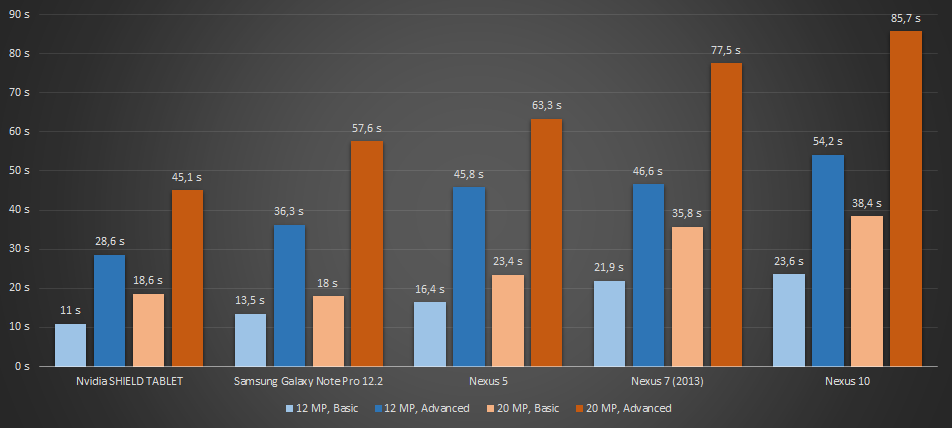
All Measurements were done using Photo Mate R2 2.5 (Release Version)
How can I create Auto-Lens profiles?
Photo Mate R2 1.7 introduces Auto-Lens Correction features.
Vignetting (light falloff at the borders of the image), Chromatic Aberration (Red/Cyan color-fringing) as well as Lens-Distortion can be corrected automatically.
When you open an image and Photo Mate says "Lens Profile found" (Tab Lens-Adjustments), you probably don't have to do anything. Your Lens is already supported.
Depending on your lens, some of the features (Vignetting/CA/Distortion) may not supported, though. In this case, you can still refer to this tutorial.
Case 1: Photo Mate says "Lens Profile not found"
There are 2 variants in this case:
a) The "i"-icon can be selected
Press on it, and see if you can find the lens you shot with in the list. If yes, please send us a raw-file and the actual lens-name of the lens you was using via mail.
Check this by using Photo Mate, open the image and go to Exif-Data. If you see your Lens information (just the Focal-Length is not enough!), contact us. Otherwise, check the Exif-Information from your raw-image with some external software. If there is no Lens-Information, you always have to select the Lens manually.
If not, read ahead at "Creating a new profile"
b) The "i"-icon can't be selected
In this case, Photo Mate could not find a camera-profile. In this case, we also need the raw-file and information about your camera (if you have some). Otherwise we'll look ourselfs online.
Case 2: Photo Mate says "Lens Profile found"
Then set the checkbox "Use Lens-Profile". See what parameters are supported. If you can see that some are missing (like Chromatic Aberration Red/Cyan sliders are still available or Vignetting options are still available) you can read ahead at "Creating a new profile"
Creating a new profile
In case your lens is currently not supported or some important corrections are missing, you can help us supporting your lens in a future release.
First, please go to wilson.bronger.org/lensfun_coverage.html and check if your lens or the corrections are really not supported. Otherwise please contact us first!
Since Photo Mate supports the Lensfun-DB data, you can use their tutorials to create profiles. Here are some links to the tutorials.
Create or Edit the XML-File
Put all the values together in a XML-File like described in the tutorials. If you edit a lens, we recommend you extend the current lens-profile and edit it.
Please also make sure that you add your camera's crop-factor. You can find it in the xml-files, simply search for your camera.
Send the XML-File
You've got two options:
- You can send it directly to the maintainers of the Lensfun-Project. See the information here: lensfun.sourceforge.net/calibration/
- If you mainly need the profile in Photo Mate and want to make sure that you've it already in the next version, send the profile directly to our support: #mail
Please, just use one of the options! If you send it to us, we'll forward it to the project, so you just need to send one mail.
How to convert raw files to jpg files
- Open the folder in the gallery
- Press the menu button. This is either the one on your device or in the upper right corner on tablets.
- Select the option "Export all images..."
- Set as target-format "JPG"
- If you want to quick-convert the raw-files, disable the "Render XMP-Settings" (this will only read and convert the embedded jpg of your raw-files)
- Start the convert process
Keywords:
How to import images from an usb-connected camera
- Connect the camera to your device
- Turn on your camera
- Android should come up with a list of available apps. Choose Photo Mate to handle the event.
- If there doesn't come up a list but directly an app (like the gallery for instance), go to the settings
- Choose Apps and select the application which came up from the list
- Choose the button "Clear defaults"
- Disconnect your camera and restart at the beginning
Keywords:
SD Card on Android KitKat
Since Android 4.4 ("KitKat"), external apps are not allowed to write on any external storages (External SD-Cards, USB-Storages, etc.)
For Photo Mate, this means you may view and even edit images on that storages (when you edit, the XMP-Data is stored in the internal Photo Mate folder), but exporting images to that location is not possible. What if you want to save to your external storage, anyway?
- If you're using Lollipop, please access your SD-Card via Photo Mate. It will ask you to follow necessary steps to re-activate the writing permissions.
- If you don't have a rooted device nor lollipop and don't want to root it, you can create a folder-structure on your external storage which should look like:
Photo Mate R3: Android/data/com.tssystems.photomate3
Photo Mate R2: Android/data/com.tssystems.photomate2
You can then use this folder and also write to this folder in Photo Mate. Please use your system's file explorer to create this folder first - If you have a rooted device, you can find several tools to unlock this limitation.
Important!
If you store your files in the external app directory, make sure you backup this directory before you uninstall the app! Android will delete this folder when you uninstall Photo Mate!